IDE's
27 October 2020
Find the video accompanyment for these notes here
Table of Contents
- Introduction
- IntelliJ
- IntelliJ Basics
- Plugins
- Debugging
.ideafolder- Summary
- Exercises
- Thanks and Credit
Introduction
An IDE (or Integrated Development Environment) is a GUI application that provides a comprehensive suite of tools for programmers. This is very different to the alternative, which is using separate programs for each task. IDEs have a gentler learning curve and wide spread usage than the alternative, making them a easier choice for less experienced programmers. In this lab we will aim to show the basics of the Jetbrains IntelliJ IDE, and we will introduce more general IDE concepts and context. Hopefully this can then be transferred to both other Jetbrains IDEs and other IDEs generally. Jetbrains has a large number of IDEs with support for the vast majority of popular languages.
IntelliJ is Jetbrains’ first and largest IDE, and it is one of the most popular IDEs in the world. Initially it was only for Java development, but since then has added support for a large number of languages and you can use modules to add support for even more.
Additionally Android Studio is built atop of IntelliJ. Most techniques learnt for IntelliJ can be used directly for Android Studio.
Installing IntelliJ
You can download IntelliJ from the Jetbrains website here, and as a student you can get the “Ultimate Edition” for free here.
Installation varies from platform to platform but is normally straightforward. Follow the instructions on IntelliJ’s site.
When you first start IntelliJ you will be asked what theme you want to use and which plugins you want to install. I recommend you keep the number of plugins low, turning off some of the included ones. This reduces the number of features you’re presented with when starting. Don’t worry, you can add plugins back later.
IntelliJ
IntelliJ is massively configurable. Nearly all behaviours and keyboard shortcuts can be configured. For this reason we’re going to be looking at IntelliJ as it comes out the box, and we’ll be giving the default keyboard shortcuts for Windows and macOS, but you can change these as you wish.
IntelliJ is incredibly feature rich, which can be intimidating. But if you get to know how to do the basics you can start using it and learn the rest of the features as you need them.
IntelliJ Basics
Lets run through some of the basics of IntelliJ before we start looking at some more advanced features.
Making a project and project templates
When you start up IntelliJ for the first time you will be presented with a screen to create a new project or import a project. If you have already used IntelliJ on some projects you will see a list of the projects IntelliJ knows about on the left.
In the Create Project screen you will be presented with the Templates IntelliJ has installed. Templates are merely an initial set of project configurations and files to get you started with specific platforms. But projects are not set in stone by their template - you can add all the features and platforms you like to your project by changing the settings and files. A lot of developers avoid templates entirely.
You then have to give the project a name and tell IntelliJ where to save the project. Then press Create and IntelliJ will make a project with the files and settings from the template chosen.
With only the plugins I need installed and with no template installed my IntelliJ looks like this.
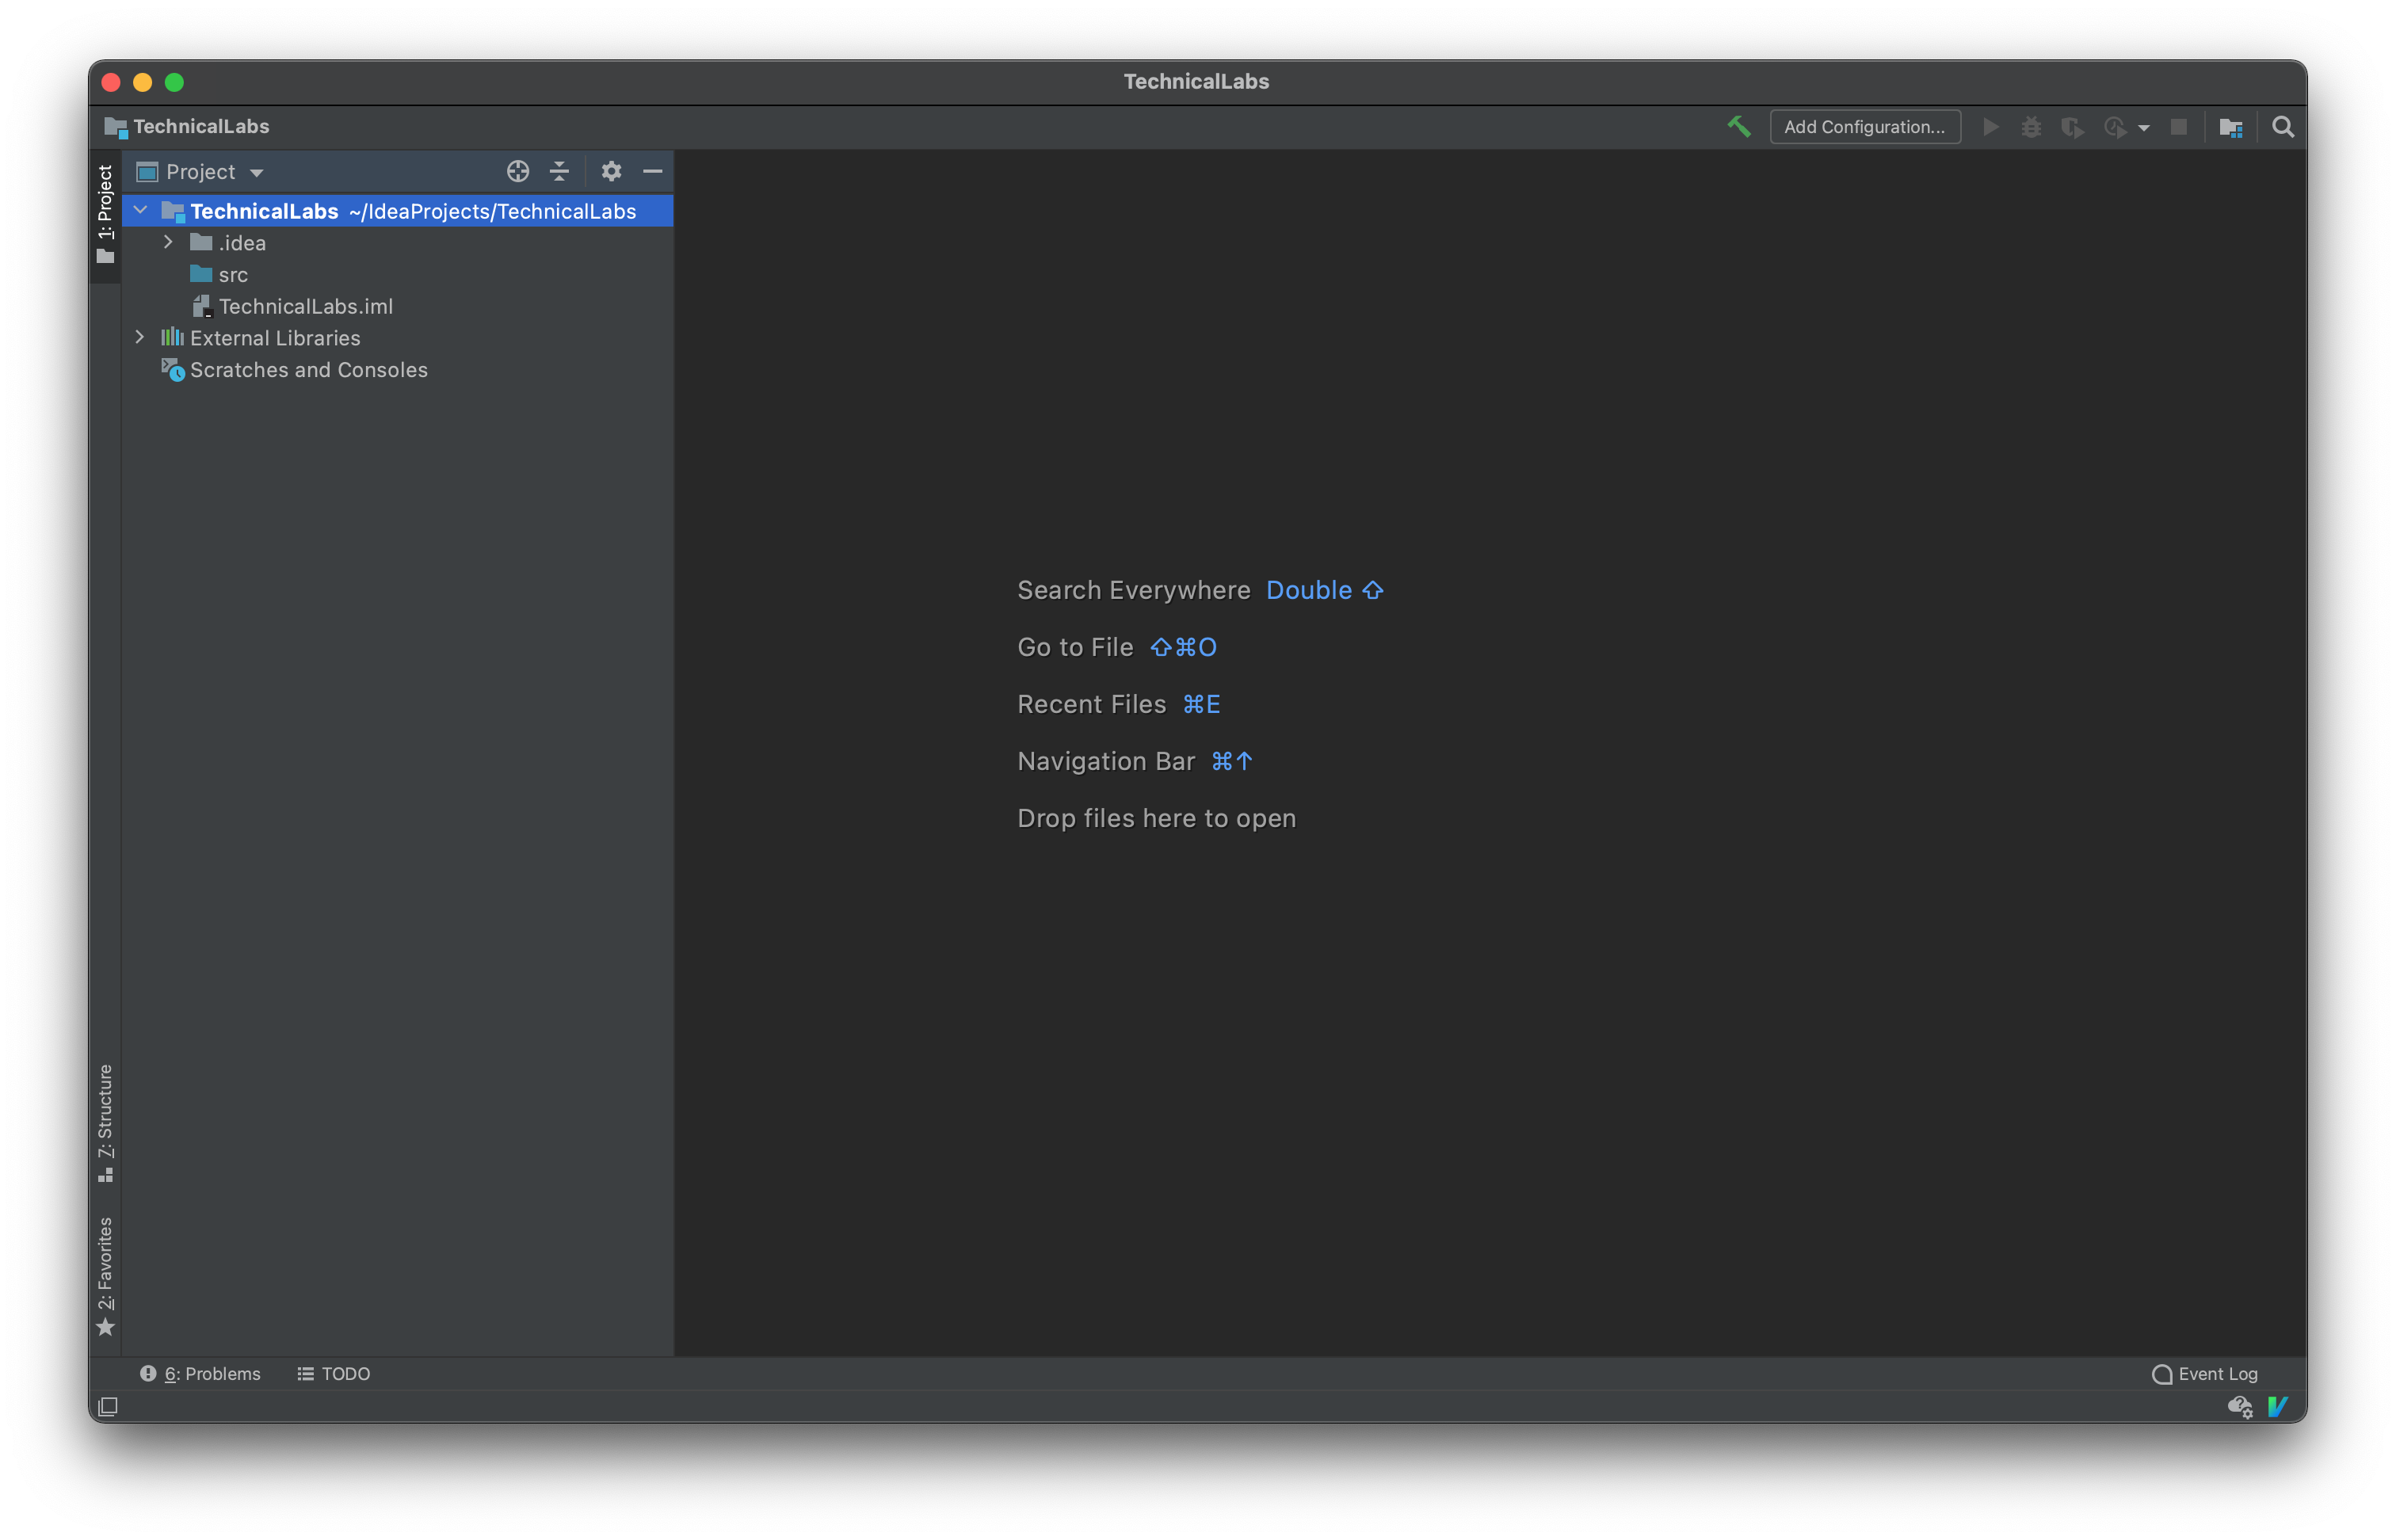
If you have more plugins installed your IntelliJ may look significantly busier.
IntelliJ Layout
IntelliJ’s layout is made up of Tool Windows around a central editor. What those windows contain and where they are is very flexible. You can add, remove, minimize, and move panes as you desire. Plugins can also provide additional tool panes.
The standard is to have navigation on the left with a central editor and panes regarding running programs (such as logs and debugging) at the bottom. By default IntelliJ uses this layout.
Navigation
There are many ways to get around in IntelliJ, but the most basic is the Project pane on the far left. There is a drop down at the top to select which view you want to use.
- The Project view shows the structure of your program by each file’s dependencies. However this won’t reflect the actual file structure of your project.
- The File Structure view shows the actual file structure of your project.
- The Problems view shows the problems IntelliJ has found in your project. For instance the errors and warnings generated when the project attempts to compile.
Double clicking any item in the Project Navigation pane will open it in a tab in the editor window.
Another way to get around is search - to open the search press Shift twice, enter whatever file or item you’re searching for in
the search window and then press
enter to open a tab at that item.
There are many other ways to get around in IntelliJ, but they’re outside the scope of this lab.
Editing
Editing text and code in IntelliJ can be much like any other text editor you’ve used. But IntelliJ has lots of smart ways to make writing code a little easier.
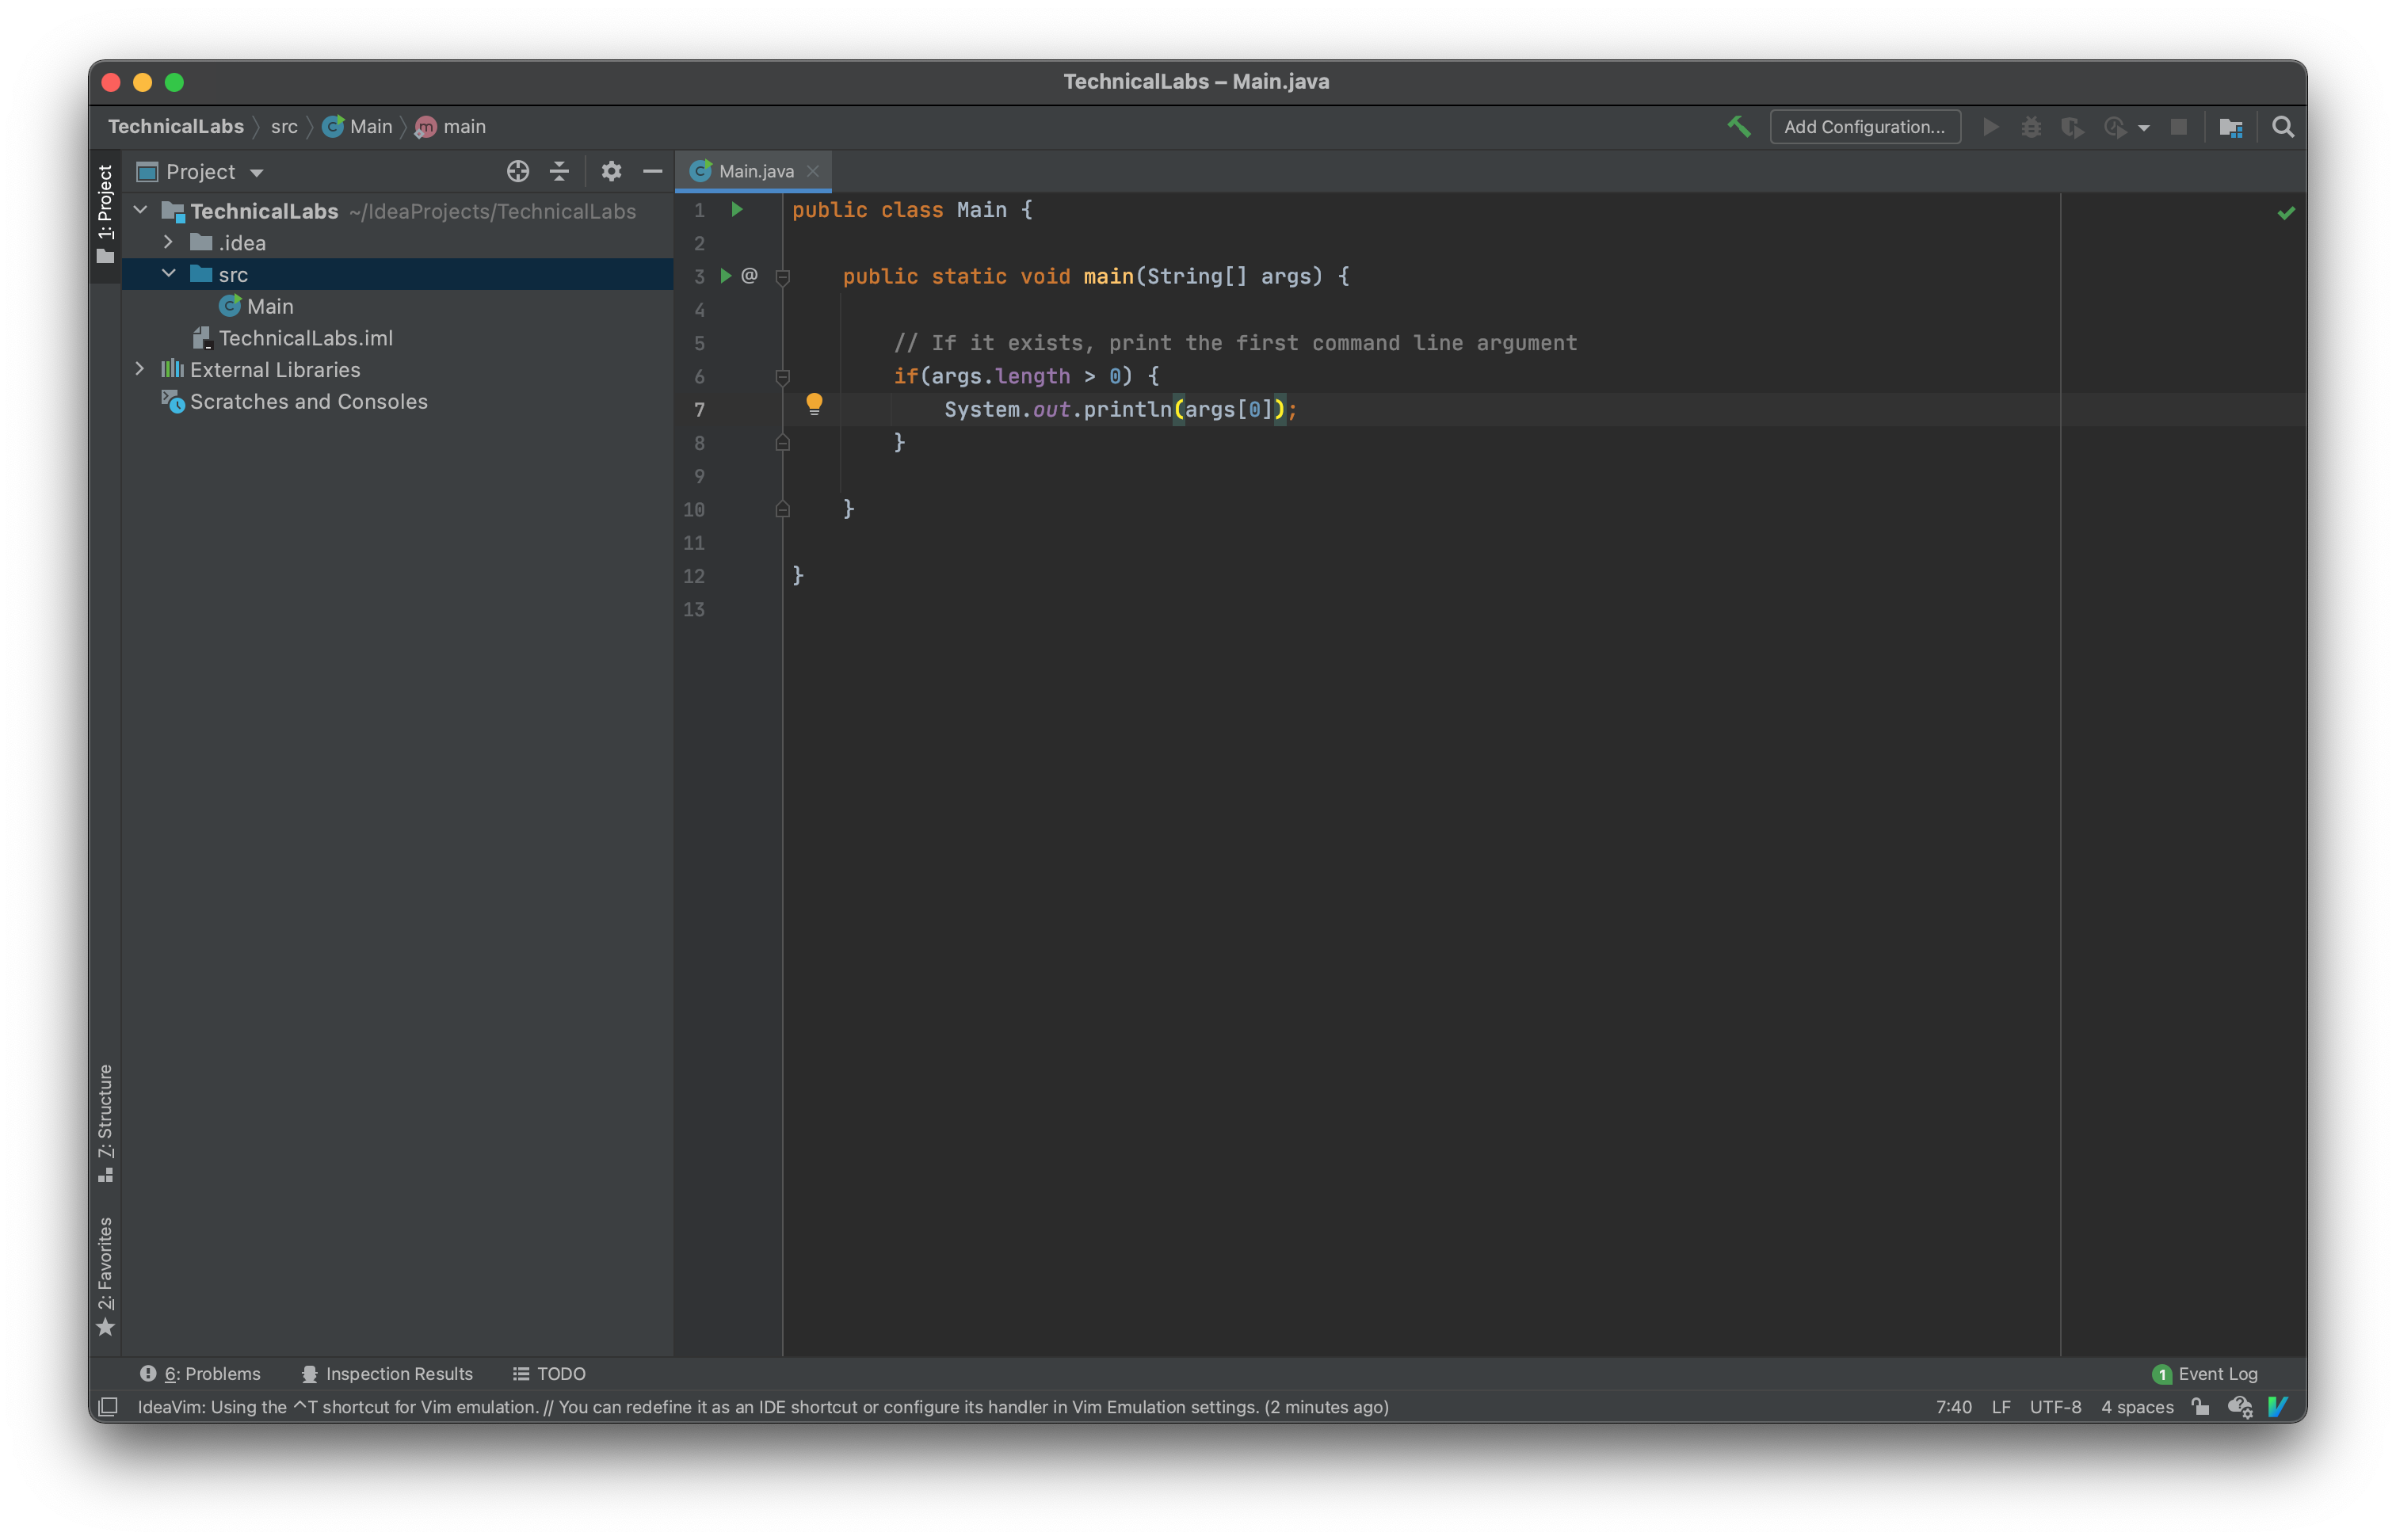
IntelliJ has syntax highlighting by default, which can make understanding code a lot easier.
Also, IntelliJ will constantly inspect your code while you write it and find where your code doesn’t match the configured code style options or is unlikely to compile. It will annotate with warnings and errors to show this.
Some simple tricks
Live templates
IntelliJ has a bunch of shortcuts to avoid writing lines that you have to type over
and over again. These are called Live Templates. For example, when writing Java
you can type sout to make a System.out.println(); statement. Other snippets
like this can be found and configured in IntelliJ Preferences > Editor > Live
Templates
Code generation
Often when writing Java you will find yourself writing code blocks like access
methods or interface implementations, which are fairly simple. IntelliJ can
write some code for you! Press Alt+Insert on Windows or ⌘N on macOS to enter
the Code Generation window. Then you can select what code you want IntelliJ to
generate.
Quick fixes
A lot of code problems, like typos, access modifier mismatches or
missing imports can be fixed pretty easily. At any point when editing IntelliJ
you can open the Quick Fixes panel to display the solutions IntelliJ
thinks it can provide in the code where the cursor is. To open the panel use the
shortcut Alt+Enter on Windows or ⌥⏎ on macOS. Preview any fix with
Ctrl+Shift+I on Windows or ⌥Space on macOS. Just press Enter to apply the
change.
Code formatting
A lot of Computer Scientists have strong opinions over how code should look.
IntelliJ can keep your code consistent to a set of rules. You can get IntelliJ
to reformat your code with Ctrl+Alt+L on Windows or ⌥⌘L on macOS.
You can set your code style preferences in the IntelliJ preferences menu.
Renaming and refactoring
One of the most tiresome and error prone things to do when programming is to rename something or (more generally) to refactor code. Fortunately,IntelliJ will help you out with its extensive reformatting tools. You can find these in the Refactor section in the menu bar.
Generating documentation
IntelliJ can do some of the grunt work in writing JavaDocs - simply type /** in
front of a class or function and IntelliJ will add lines for all the public
fields or parameters.
File management
File management can be done in the Project pane. To move files simply drag and
drop them into place! As the result of a move you may be prompted to refactor
code. To make new files you can right click in the Project pane and select
new. It will then let you choose from a variety of supported file types.
Building, Compiling and Running
IntelliJ has a very flexible system for configuring build systems. Build systems will be the topic of a future lab so we won’t cover them in depth here, but the gist is they can be used to automate the tasks required to build and compile a project. This could include tasks like finding and compiling dependencies, running tests on the code, compiling the code and running the compiled output.
The IntelliJ build configurations cover a large range. You can use build systems
like Maven or Ant, or simply compile and run your code. Either way, it all starts
in the Run/Debug Configuration window you get to from the configuration
button / drop down in the top right. From this screen you can add as many
configurations as you like.
Here we will set up a simple configuration to run this command line application.
We want to make a configuration to compile and run this code. To do this go to the configuration plane again, and click the Add button in the top left. Here we can choose what template we want the run configuration to use - in this case the “Application” template does everything we want. We give the config a name and we specify the class we want the program to start with. We can specify options for the Java Virtual Machine, specify parameters for our program, and even specify environment variables. For this program we just need to specify the Main class and add some program arguments.
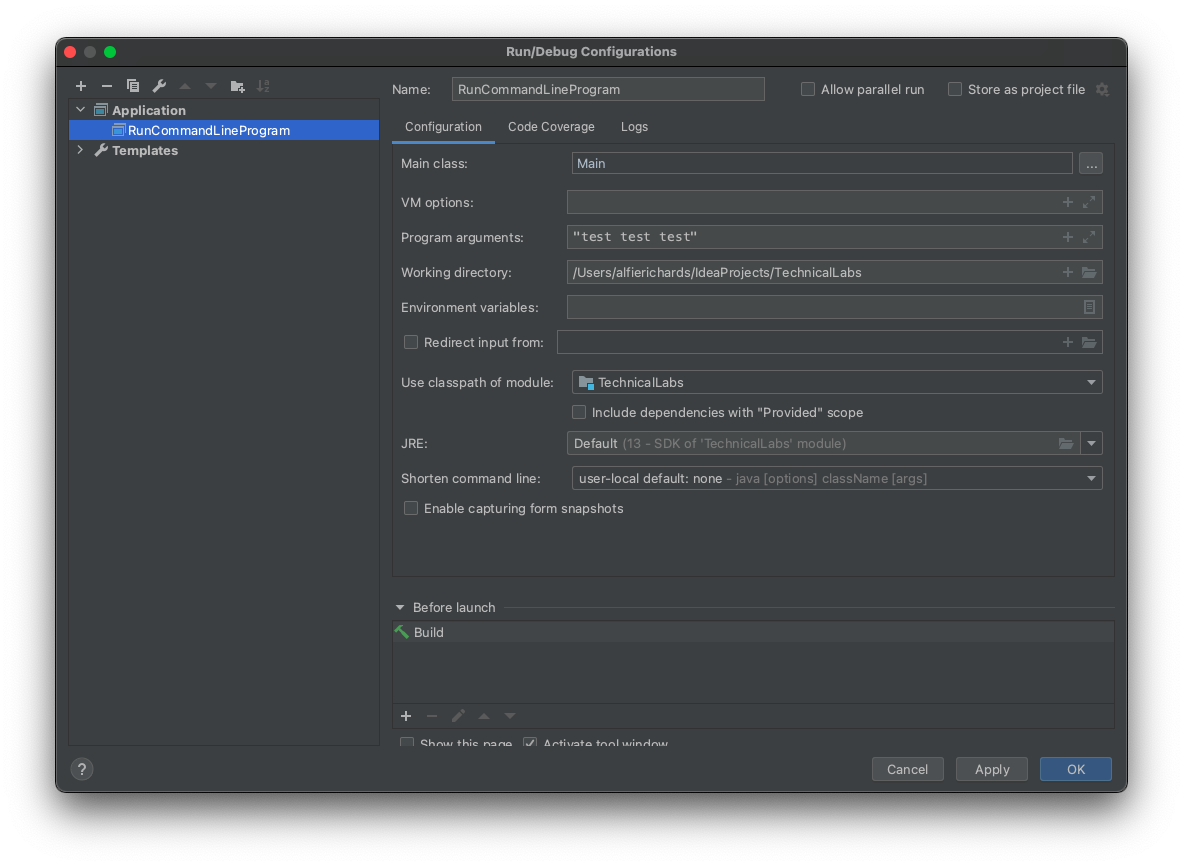
You could also select “Allow parallel run” if we need to run the same program multiple times. For example, if you were testing multiple clients for a server.
Now we have a configuration we can select it in the Run Config dropdown in the
top right, and the Run button will then appear. Upon pressing that button
IntelliJ will compile and run the program. You can also use Shift+F10 on
Windows or ⌃R on macOS.
After pressing the Run button IntelliJ will open the Build and Run panes in the
bottom window. The Build pane shows the output of the build config, and the Run
pane shows the stdout of the program and allows input into stdin.
Compiler output
By default all your source code should go in a directory called src and
IntelliJ will output the compiled code into a folder called out. This keeps
your file structure clean of binaries. You shouldn’t include the
out directory in any Version Control.
Java docs
IntelliJ comes with an easy way to generate JavaDocs, you can find the tool in the menu bar:
Tools > Generate Java Doc
Plugins
IntelliJ and all Jetbrains IDEs have very flexible and powerful plugin systems. Plugins can add an incredible amount including support for other languages, different build tools, themes, version control, and even plugins to assist with the development of plugins.
Adding and removing plugins
You can enable, disable and remove plugins through a page in the preferences window:
IntelliJ preferences > Plugins > Installed
You can find new plugins and install them from the Marketplace tab.
Plugins often add extra pages to the preferences window to let you alter the behaviour of the plugin.
Version Control
One of the most popular category of plugins on Jetbrains IDEs are Version Control plugins. Git was the subject of the 2nd and 3rd Technical Labs and so won’t be covered here. However the Version Control plugin and the Git and GitHub plugins allow you to run many Git commands directly from IntelliJ and present information about your repository in a GUI.
However, you do not need to use the plugins - if you are more comfortable with using Git in the command line or with another Git interface you can.
Deployment plugins
There are lots of plugins to facilitate deployment and continuous integration. Both of which will be the subjects of future labs.
IDE Feature Trainer
IntelliJ has a plugin available called IDE Feature Trainer that will walk you through a lot of the features of IntelliJ.
Debugging
IntelliJ supports a powerful debugging and profiling suite. However debugging will be the subject of a future Technical Labs so we will not cover it in this lab.
.idea folder
IntelliJ stores all of its settings and information about a project in the .idea
folder within the project. For any project in which you are using Version
Control you should make the decision whether or not you will include it in the
repository.
Summary
We’ve shown you how to get around in IntelliJ, and tried to break down some of the scarier things IntelliJ will do. But more importantly we want to communicate that IDEs are tools for you, and you are in control of them. You can customise it to your liking and change its behaviour to match your tastes and needs. You do not need to keep all the plugins you are not using if they just add bloat. Equally, you can add plugins and tools for whatever you want, to make the IDE better for you.
We focused on IntelliJ a lot here, but all other Jetbrains IDEs are built on the same platform, and cover a massive range of languages. For instance you can use Pycharm for Python and CLion for C, and have a consistent and similar experience between all of them.
There are also lots of other great tools and IDEs out there. They all have differences but almost everything gone through here is applicable to the majority of IDEs, just with different shortcuts and layouts.
Also, all of these features can be found in separate tools - an IDE simply gathers all the tools together into one program. Use whatever you prefer and feel most comfortable with.
Exercises
- Get a Jetbrains student account and download the Ultimate Edition of IntelliJ
- Make an empty project in IntelliJ
- Make a basic
mainfunction and configure IntelliJ to compile and run the program - Find some plugins you like (try Rainbow brackets)
- Look into the Version Control plugin for IntelliJ
- Get a Jetbrains IDE for a different language you use
- Change the appearance and behaviour of IntelliJ to your liking
- Open other Java projects in IntelliJ and set them up to run properly
- Install and use the IDE Feature Trainer plugin
Thanks and credit
The vast majority of the information for these notes comes from the Jetbrains help articles.
Written by Alfie Richards.
Edited by Joe Cryer
Additional thanks to: